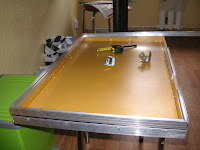
Finally I found some time to write the story about my new home(/kitchen)made flightcase-pedalboard. :)
Enjoy!
 1. I measured the plywood as desired and used a saw to get the shape.
My plan was to get a usable space of 70 cm X 40 cm (27.6 in X 15.7 in) and a height inside of 15 cm (5.9 in).
I used 9 mm (0.4 in) plywood for the project.

2. After the plywood was in the needed form I cut the alu-edges to the needed lenght and pre-drilled the holes in edge lining. I am using the 4mm (0.2 in) pop rivets so I used the 4.1 mm drill.
3. First I put together the bottom - starting with the endings. The most important thing is to drill the holes in wood as appropriate - afterwards it's not that easy to correct something if mistakes have been made. I also used small gaskets on the other side as can be seen in some pictures here.


After the endings were done I could mount the sides.

4. Afterwards basically the same thing needs to be done with the lid of the
case.

5. The locking extrusions have to be cut to the needed lenght (the most difficult is to get them to the correct lenght considering the ends have to be in 45 degrees - honestly I didn't managed this perfect - but as said - it was a kitchen project (so I did not had all the specific tools which may be useful) and it is not bothering me at all. You have to bear in mind that the butterfly locks will be installed so the front part will need 3 smaller pieces of extrusions instead of one long piece as on the back part.


Once it's all put together the ball corners can be attached - but this is not a major thing of course so you can leave it for the very end as well.

6. Installation of butterfly locks is a bit tricky but not that bad as it may seem. 1st of all - the
holes in the face side need to be made - then the dishes can be installed into the bottom front side.


Afterwards the holes in the lid can be measured by checking them opposite to the bottom - just to be sure they will stick together firmly.


Once this was done, I attached the side corners to get it a better look and solidity.
7. Now I could install the hookover hinges in the back of the case. This is very important thing (I'm serious now). First I installed the hinge on the base back and then on to the lid.


8. Finally the handle could be attached to the front of lid :)

9. Last phase. The inner part should be done now - I made the pedalboard from a 7mm (0.3 in) plywood with a second floor for better access to the 2nd line pedals. Everything is covered with a nice looking carpet. Power supply is hidden under the second floor - shelf.
Board is attached to the case's bottom with screws so it can be removed at any moment if needed. Some of the pedals are attached with the same old rivets - tough, reliable and top secure. Few of them have velcro. I installed in and out sockets in the back of the shelf so that there's no need to touch the 1st and last pedals for plugging the whole thing into my chain. What is still planned - to attach a powerstrip in the back so I could have everything plugged in all the time. I soldered the patch cables by my own except the one Klotz patch cable. Well. That's it!
10. plug in!


2 comments:
Nice board, and a very cool collection of pedals. Bet the Tube Monster sounds great, I have the Behringer Vint. Tube Overdrive and it delivers big hairy Vintage Fuzz - Love it.
Your blog is really cool (the tele undebatably is the greatest guitar!), is it ok if I add it to my bloggs-list?
cheers
ben
Hey Ben,
thanks for your post. Yeah I think that Behringer VT-999 is really underrated pedal, it delivers really cool and amp-like sound & feel.
Actually my board has slight changes in the meanwhile - I have some newcomers - will post it shortly :)
Post a Comment
have some thoughts?